


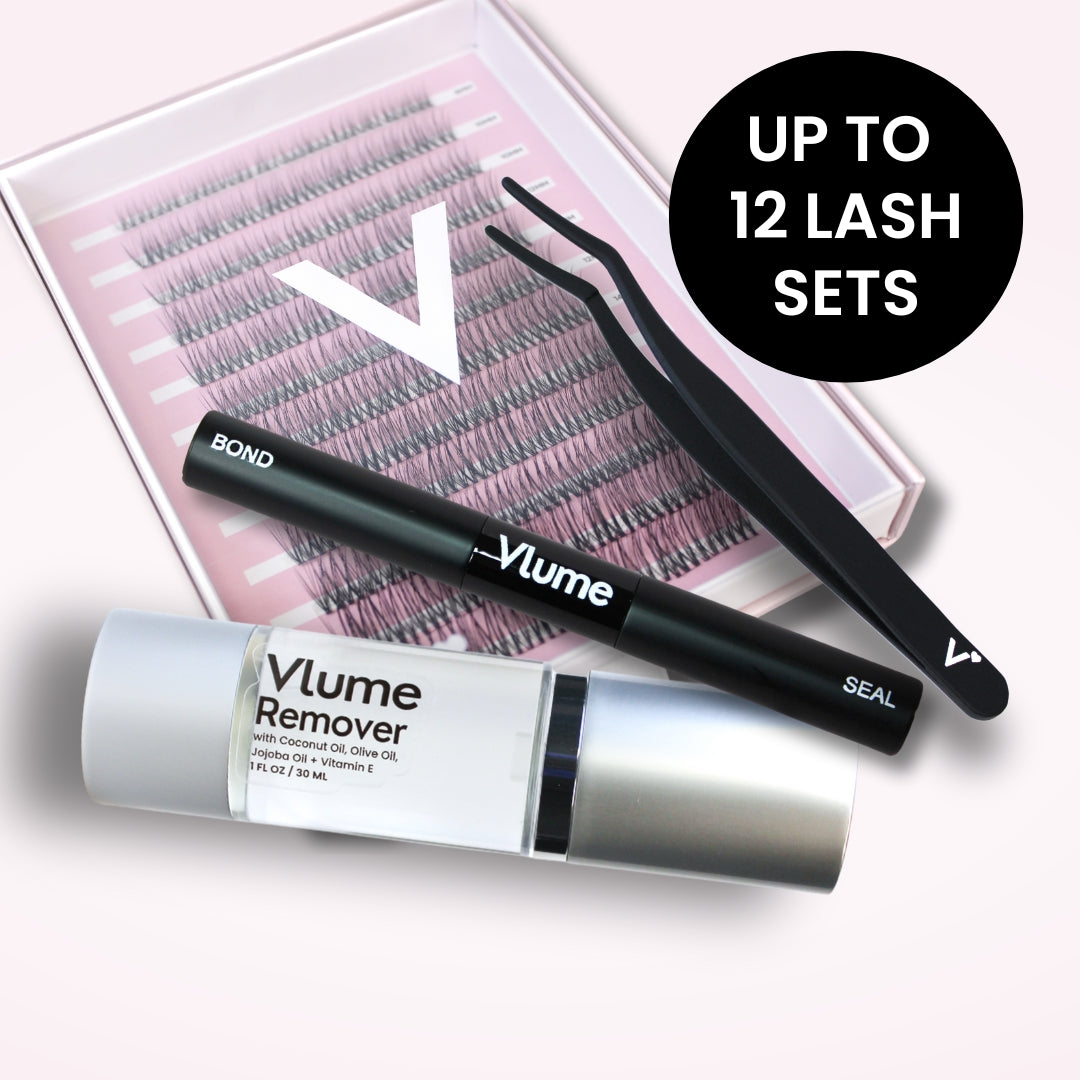
STARTER DIY LASH VAULT
STARTER DIY LASH VAULT
Couldn't load pickup availability
SOLD OUT 6X!
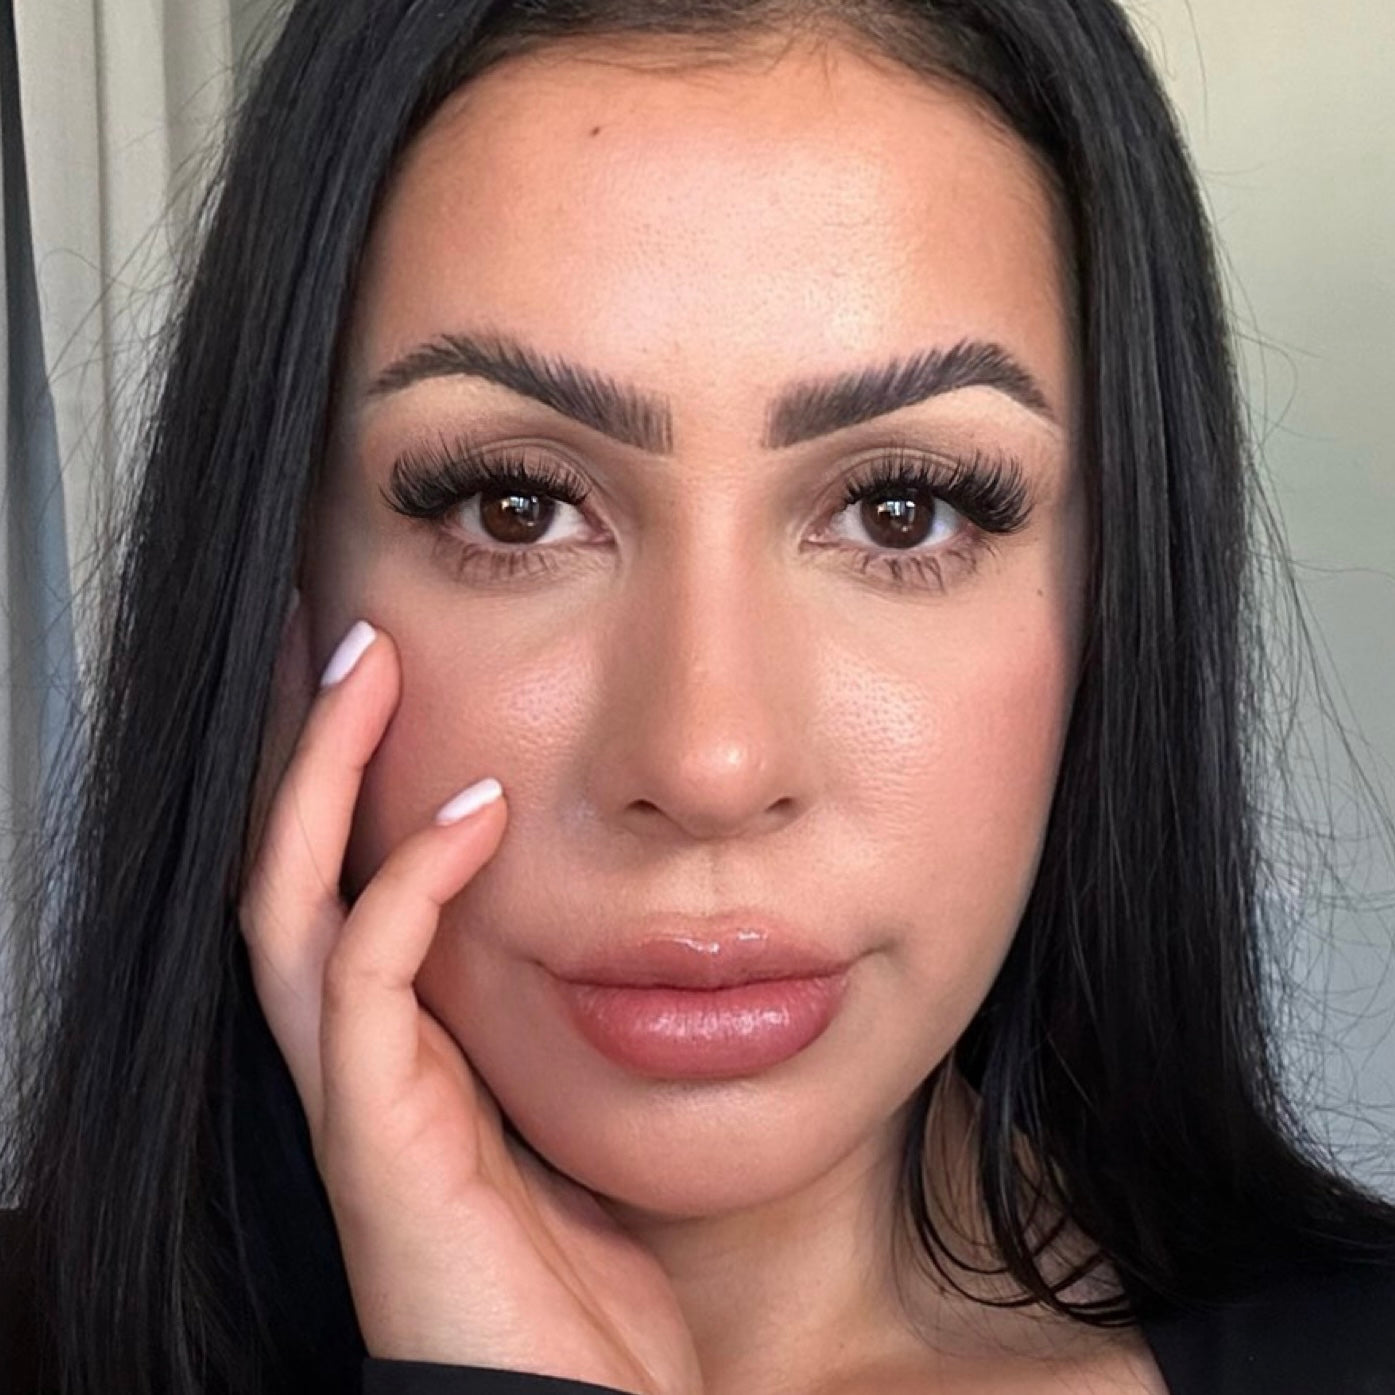
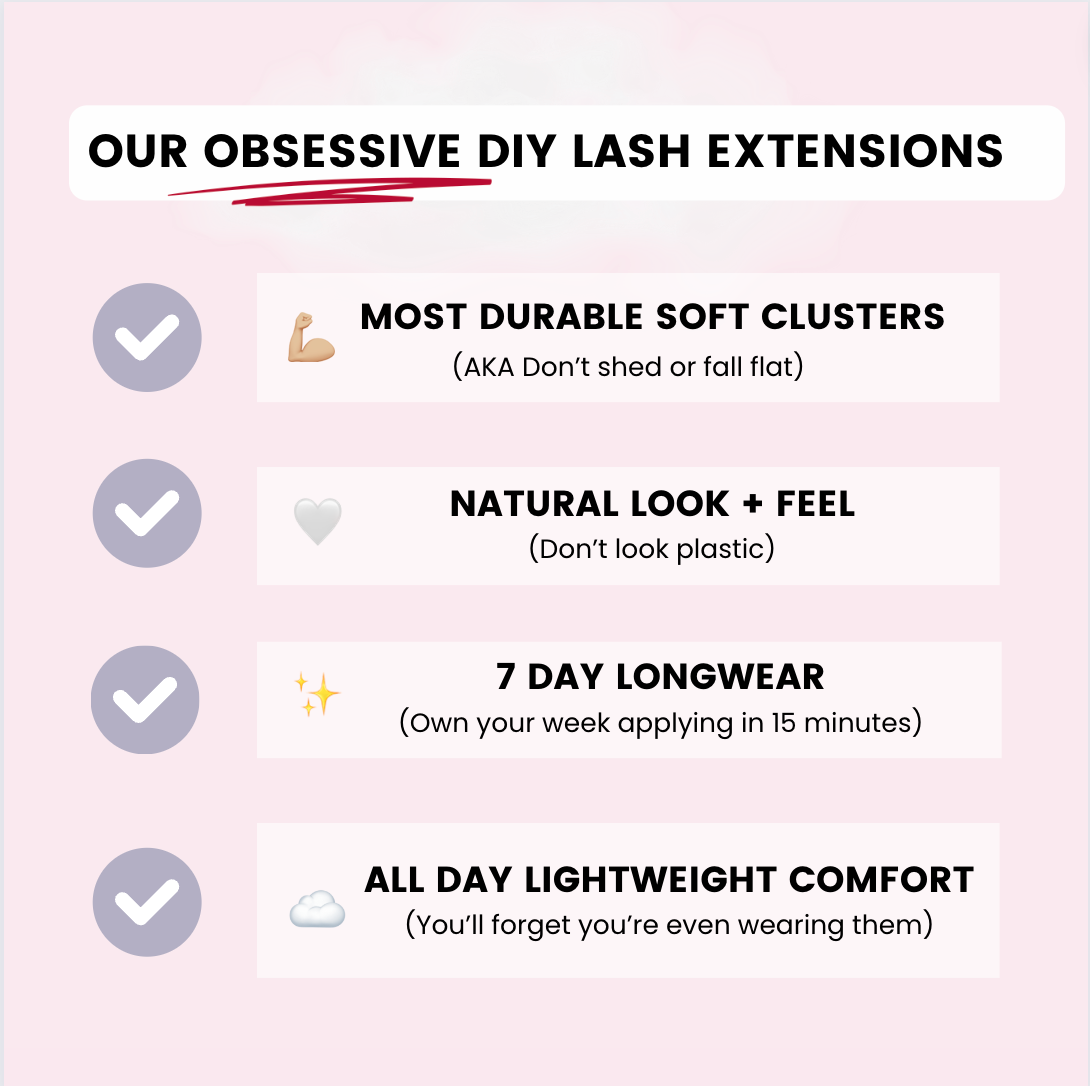
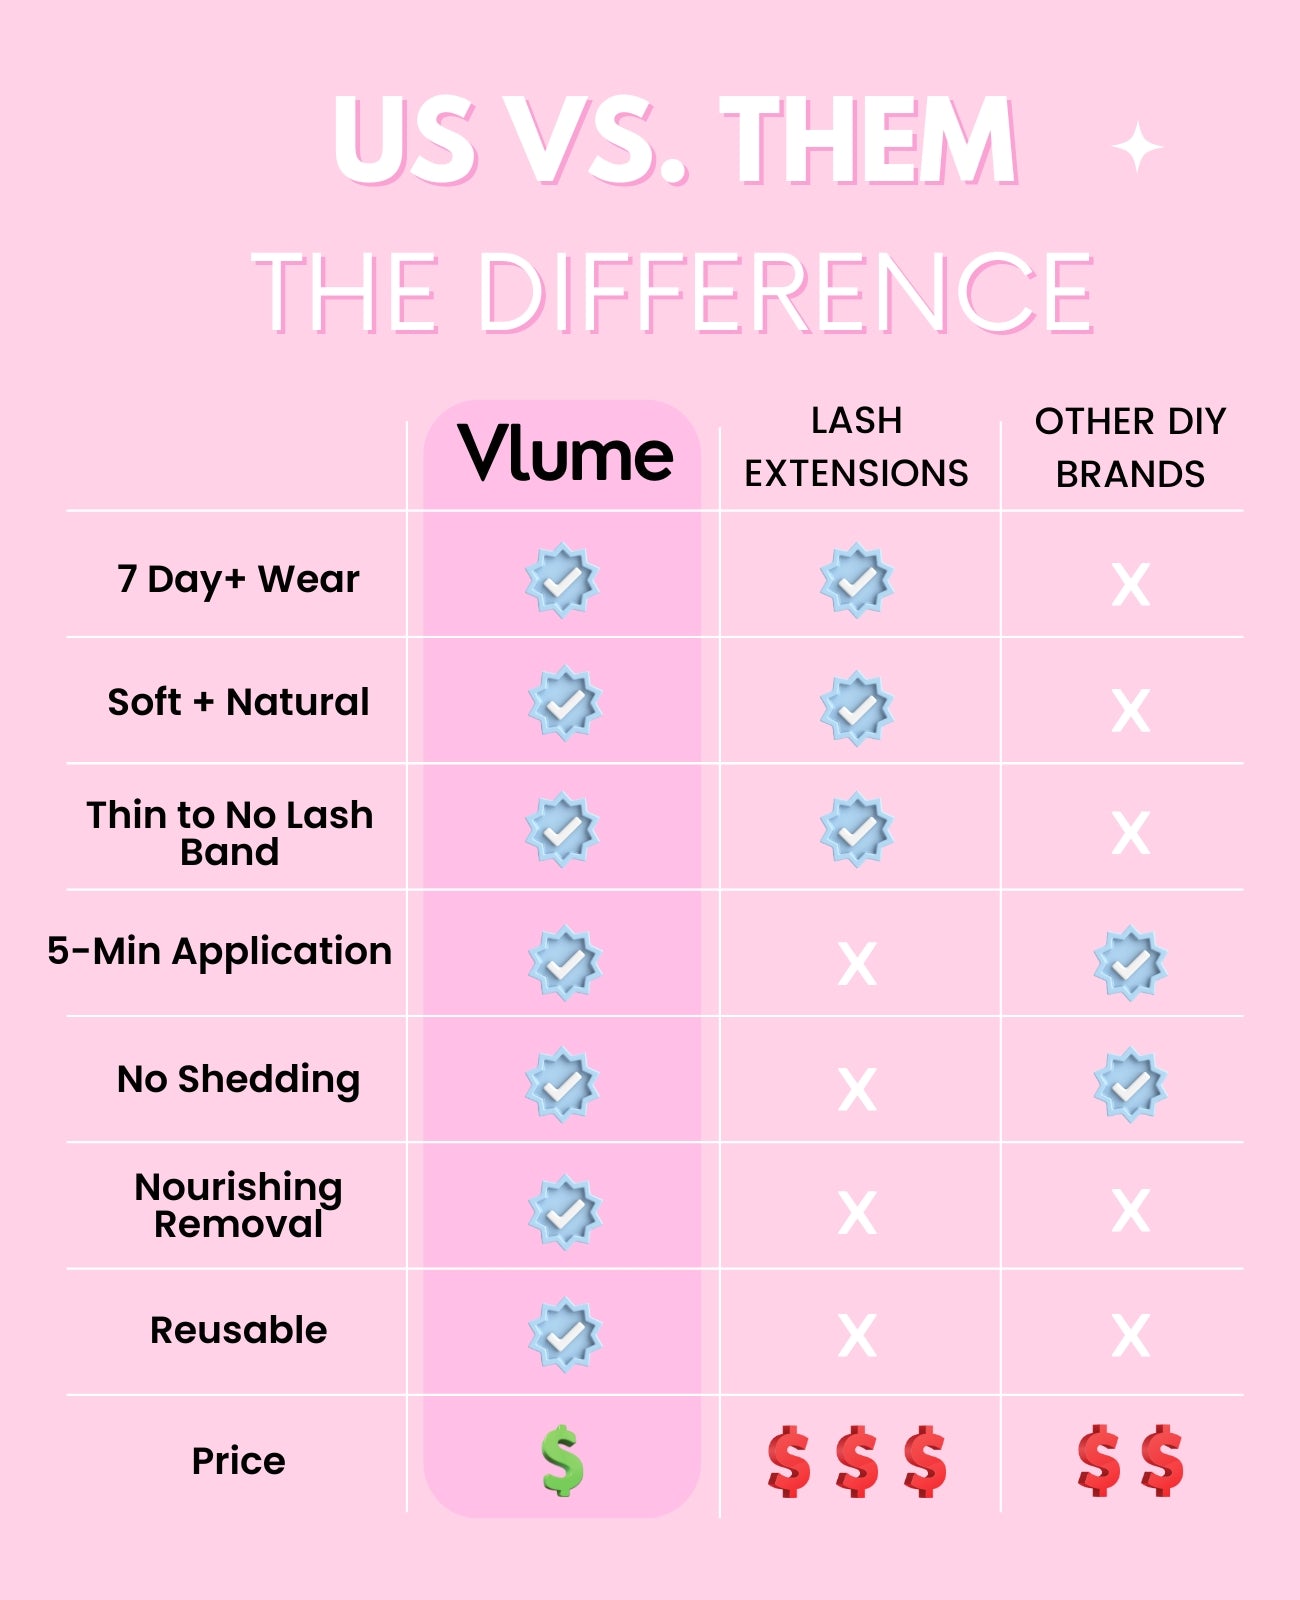
The ultimate lash extension-looking set at home that gives you obsessive length + seriously ignites your confidence.
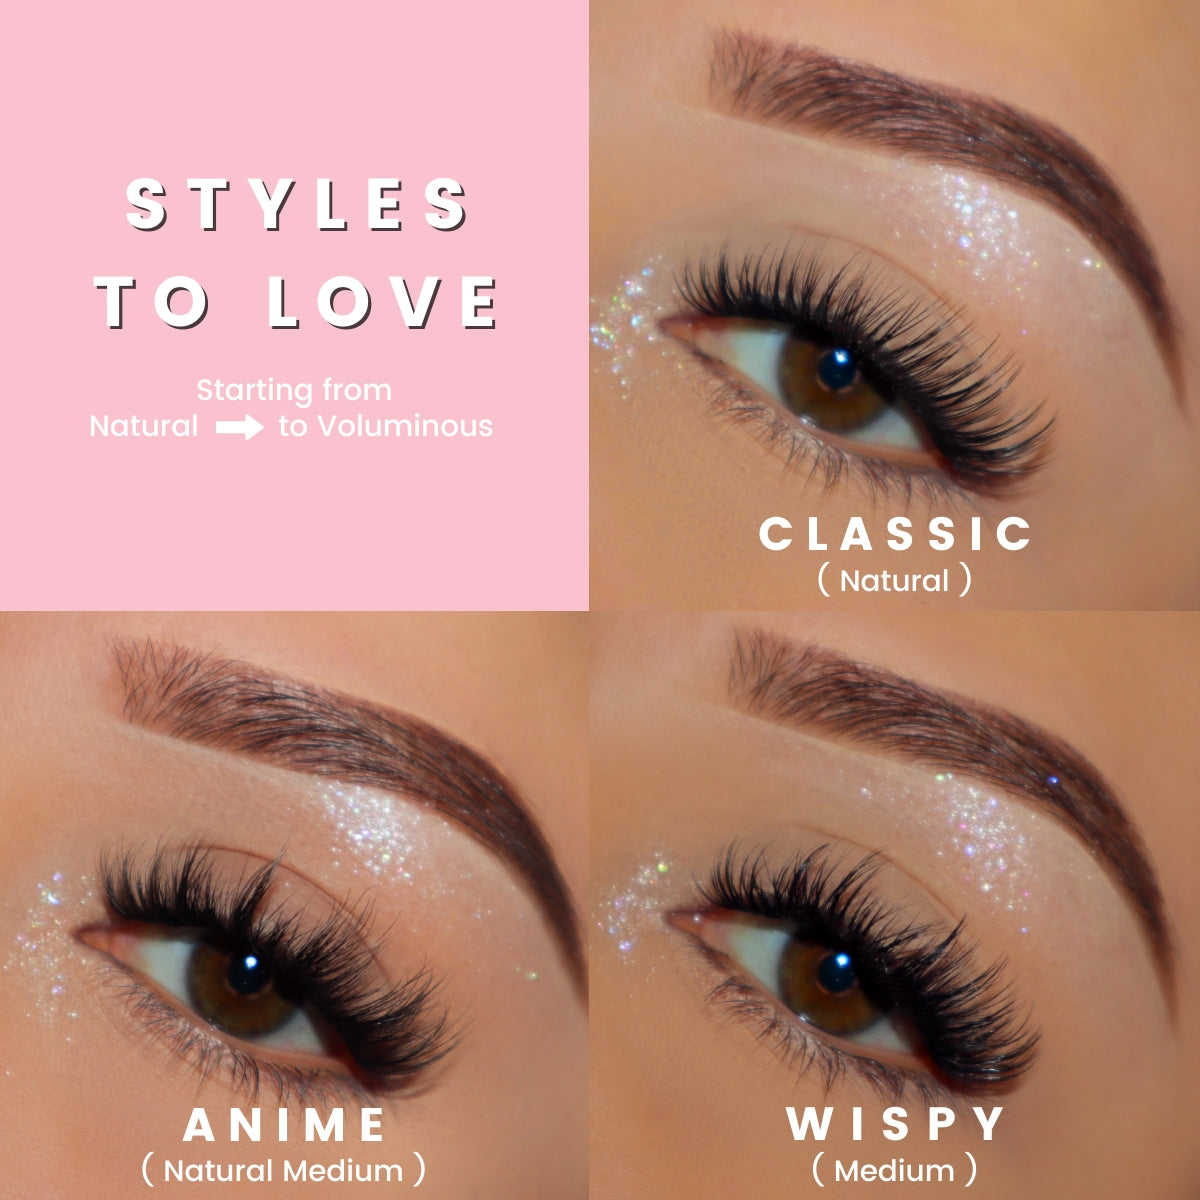
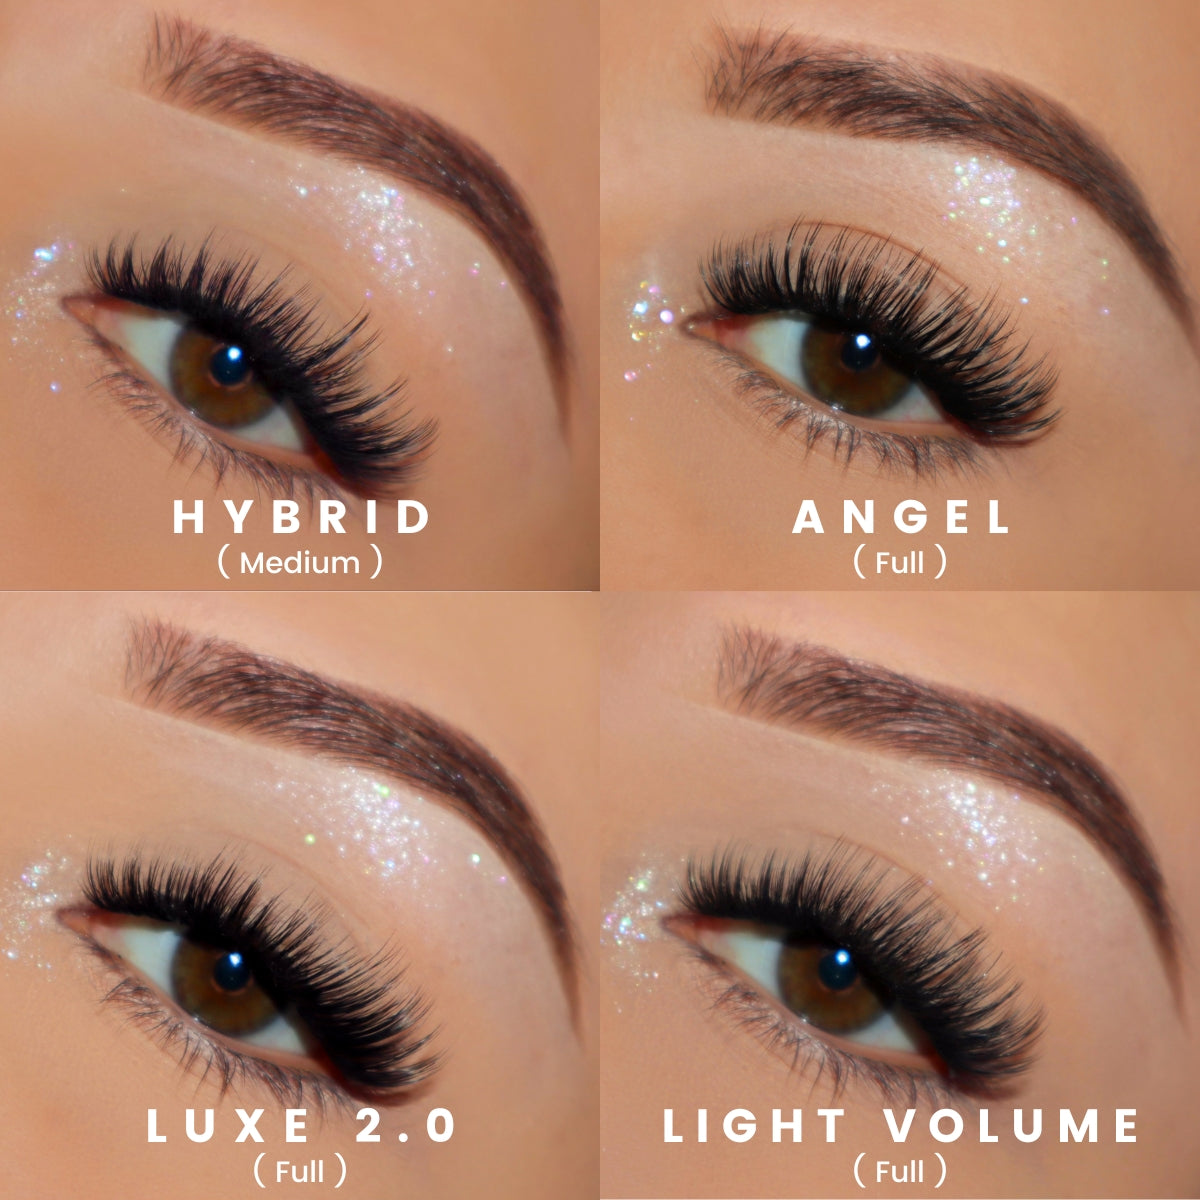
Different sizes to achieve any look (from doll- to cat-eye). Includes the full experience + all the starter items needed to get the lashes of your dreams.

BUNDLE INCLUDES
- 1 Clusters box of choice
- 1 2 N 1 Bond + Seal
- 1 Remover Serum
- 1 Precision Applicator
- 1 DIY LASH GO-TO GUIDE
- 1 Lash Bag
*VS. the DELUXE bundle that includes the Overnighter / Xtender Sealer, Xtra Lock Single Bond + Lash Mat.
KEY FEATURES
KEY FEATURES
STARTER DIY LASH VAULT
INCLUDES UP TO 10-12 LASH SETS**
(144 INDIVIDUAL CLUSTERS),
EACH LASTING UP TO A WEEK.
(2-5 DAYS FOR BEGINNERS)
**10-12 sets when all lashes are used
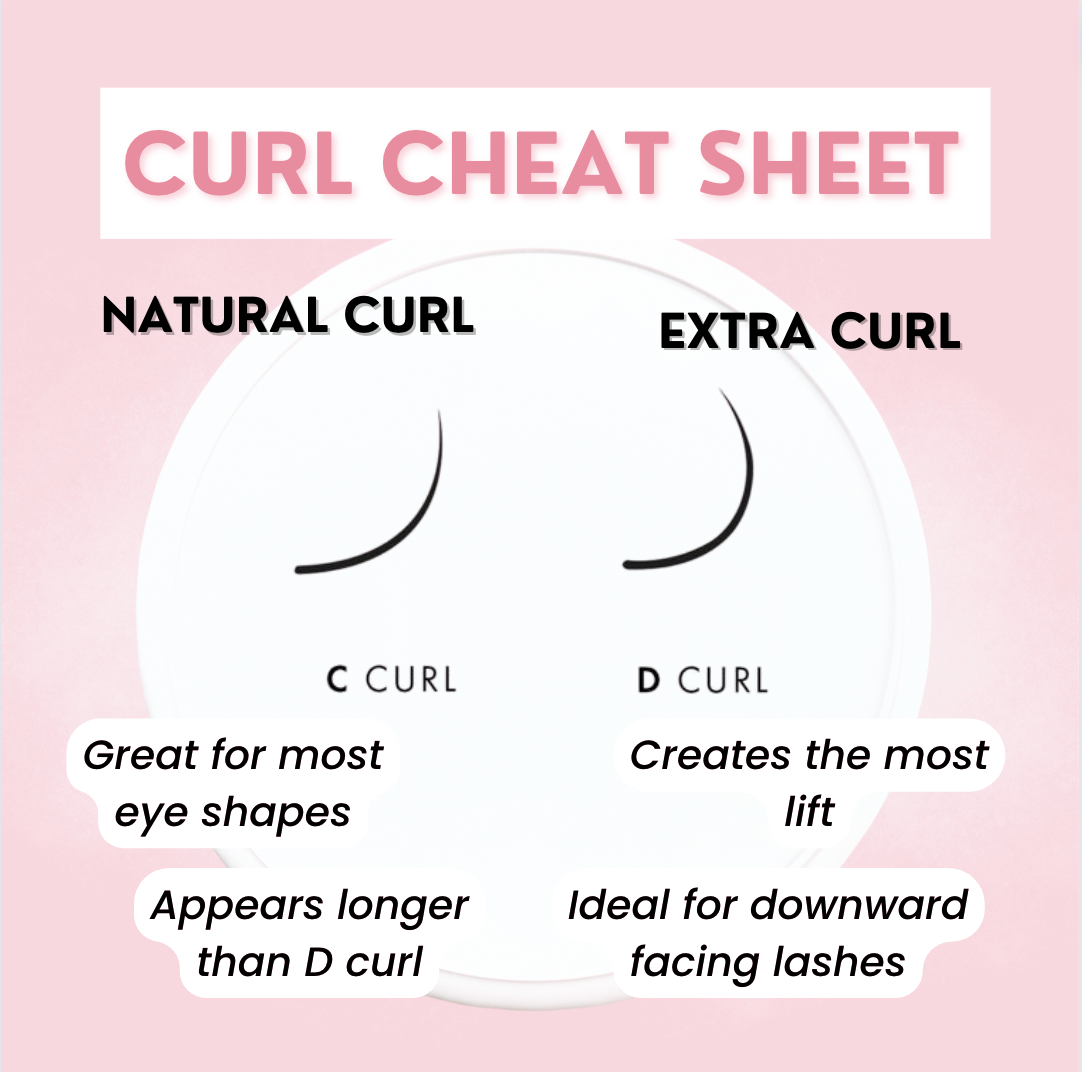
- Lightweight Faux Mink
- Curl: C/D
- Length: 8-18mm
- Rows: varies on style, check individual style page to verify
2 N 1 BOND + SEAL
- Latex-free + cruelty-free.
- Hypoallergenic & safe for the most sensitive eyes.
*All glues are latex-free. Glues do contain Acrylates, which some people are allergic to.
**Please patch test on the skin before use to check sensitivity.
Bond Ingredients: Acrylates/Ethylhexyl Acrylate, Copolymer, Water, Butylene Glycol, Ethanol, Carbon Black, AMP-Acrylates Copolymer, Phenoxyethanol, Citric Acid, Sorbitol, Ceteareth-25, Sodium Carbonate, Cellulose Gum, Ethylhexylglycerin
Seal Ingredients: Isododecane, Trimethylsiloxysilicate, Aqua, VP/Eicosene Copolymer, Polypropylsilsequioxane, Glycerin, Hydrogenated Polyisobutene, Hydroxypropylcellulose, Polysorbate Phenoxyethanol, Ethylhexylglycerin
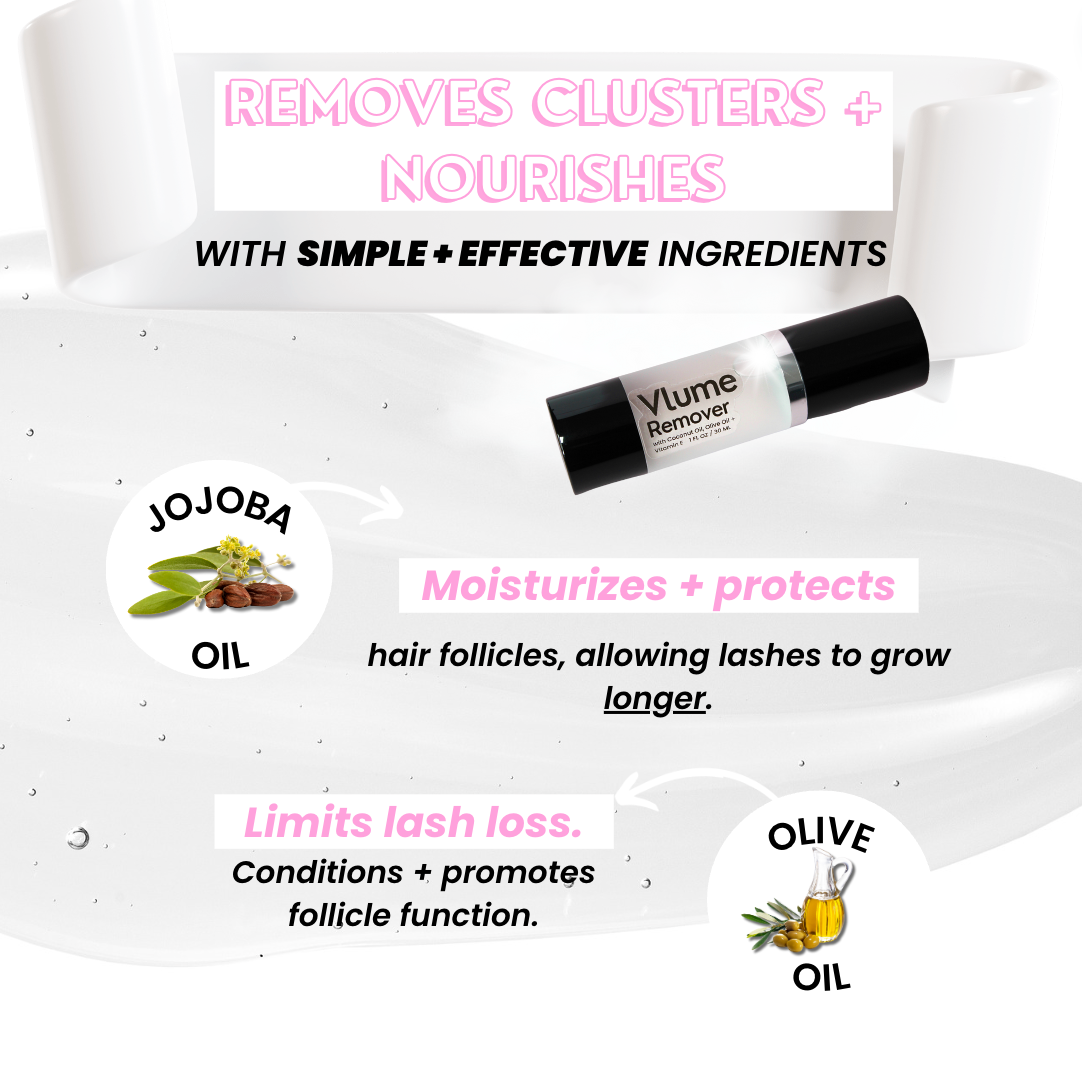
REMOVER SERUM
- Specially formulated with Coconut, Olive Oil, Jojoba Oil + Vitamin E.
Ingredients: Squalane, Caprylic/Capric Triglyceride (From Coconut Oil) , Cetearyl Ethylhexanoate, Olea Europea (Olive) Fruit Oil, Simmondsia Chinensis (Jojoba) Seed Oil, Tocopheryl Acetate (Vitamin E)
BENEFITS
BENEFITS
SAVE TIME & YOUR BANK ACCOUNT
Save hundreds on your next full set and it will only take about 5 to 15 minutes—tops.
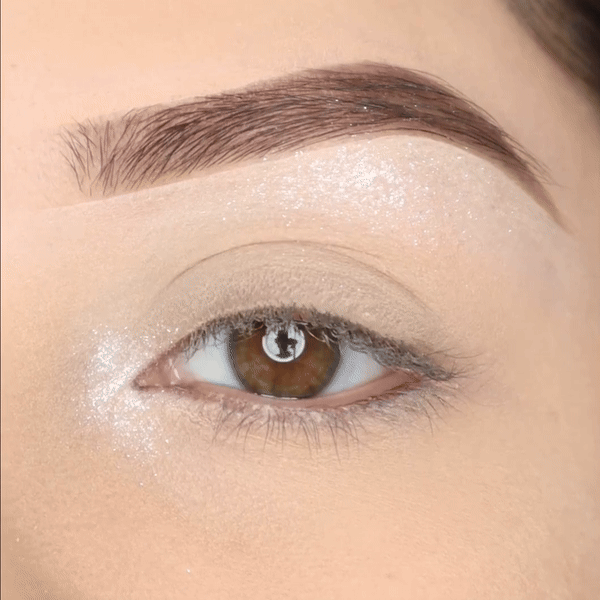
INSTANT LENGTH & LAYERED VOLUME
So curl-deep and stacked with volume, it'll convince you to finally dump that mascara … seriously.
WATER, SWEAT + SLEEP RESISTANT
Lasts through your everyday routine and the toughest life situations—from watery eyes to heavy lifting!
NON-IRRITATING
Lashes paired with fully hypoallergenic bond + seal—aka no fumes, no burning, no redness.
HOW TO
HOW TO
DIY EXTENSION APPLICATION
0. PREP: Clean your natural lashes
1. APPLY BOND: thin layer on the base of your natural lashes (1-2 coats) + apply on the lash band including ends
2. WAIT: About 15 seconds to get tacky. XTRA LOCK single bond doesn't require you to wait.
3. APPLY: Pick up your first segment with our applicator + apply under your natural lashes
4. REPEAT: for all segments and slightly overlap ends to ensure a seamless look.
5. SWIPE & PRESS: Swipe a thin layer of seal to your applicator + press the segments and your lashes together to seal the bond.
LESS BOND IS MORE! WAIT FOR IT TO DRY TACKY.
BOND PRO TIPS:
When you first open bond, the formula will be watery. Swipe excess bond back into tube until there is only a thin layer on the wand.
As you use it over time, the bond will thicken up and become easier to apply.
If too much is applied, it will clump natural lashes together along with clusters.
Too much bond + clumpiness will result in a hold that is not as strong. A little goes a long way!
REMOVAL
Take your time.
Be gentle + patient with removal.
- Apply our natural oil-blend remover serum onto lash line with Q-tip or clean finger. Massage into lashes and/or let it sit for about 1 minute.
- Slide off carefully using a clean cotton round or single use cloth + small strokes.
- Keep saturating lashes with remover + repeat a second time (if needed) until no bond is left. Repeat on other eye.
Gently clean lashes after with your daily face cleanser or preferred lash wash.
PSA—DO NOT try to pull clusters off without fully saturating bond to loosen them, or the bond's hold may pull on your natural lashes.
LASH FALLOUT
Lash fallout is normal, as the individual hair reaches the end of it's life cycle it naturally sheds.
Often times, several lashes will reach the final stage at the same time and they will all shed as a group.
**If you feel there is abnormal fallout to your lashes stop use immediately.
Visit our DIY LASH GO-TO GUIDE page for more on application/removal/tips.
SHIPPING
SHIPPING
Enjoy 2-4 Day FREE Standard shipping on all orders above $50.00
We currently only ship within the U.S. at the moment.
Shipping times below are based on orders placed between Monday–Friday.
| Shipping Method |
Ship Time | Cost |
| Standard |
2–4 |
$4.87 USD |
| Priority |
1–3 |
$11.86 USD |
|
Expedited |
1-2 |
$38.27 USD |
Orders will be processed when received, processing time takes 1-3 business days from the date the order is placed.
Route Shipping Insurance
Route ensures protection of customers shipment in case of lost or stolen.
In order to apply for Route's Shipping Insurance, you are given the option to add the insurance during check out. *By deselecting package protection, VLUME LASHES is not liable for lost, damaged, or stolen items.
Check out our Shipping page for more details.
RETURNS
RETURNS
We offer a 14-day money-back guarantee to make sure you are 100% happy with your purchase.
We want you to love our products, but understand if you need a different style!
View our return policy for full information on returns & refunds.

 WATER & SWEAT RESISTANT
 OVERNIGHT WEAR
 SERIOUS CONFIDENCE
 EVERYDAY LOOKS
 NOURISHING REMOVAL
 WEIGHTLESS COMFORT
 OBSESSIVE 7 DAY+ HOLD
 CRUELTY-FREE
WATER & SWEAT RESISTANT
OVERNIGHT WEAR
SERIOUS CONFIDENCE
EVERYDAY LOOKS
NOURISHING REMOVAL
WEIGHTLESS COMFORT
OBSESSIVE 7 DAY+ HOLD
CRUELTY-FREE
CRUELTY-FREE
WATER & SWEAT RESISTANT
OVERNIGHT WEAR
SERIOUS CONFIDENCE
EVERYDAY LOOKS
NOURISHING REMOVAL
WEIGHTLESS COMFORT
OBSESSIVE 7 DAY+ HOLD
CRUELTY-FREE
 VERIFIED BESTIE REVIEWSVERIFIED BESTIE REVIEWSVERIFIED BESTIE REVIEWSVERIFIED BESTIE REVIEWS
VERIFIED BESTIE REVIEWS
VERIFIED BESTIE REVIEWS
VERIFIED BESTIE REVIEWS
VERIFIED BESTIE REVIEWS
VERIFIED BESTIE REVIEWSVERIFIED BESTIE REVIEWSVERIFIED BESTIE REVIEWSVERIFIED BESTIE REVIEWS
VERIFIED BESTIE REVIEWS
VERIFIED BESTIE REVIEWS
VERIFIED BESTIE REVIEWS
VERIFIED BESTIE REVIEWS